Description
Nuevo Sandia Pepper - Deep, Rich Flavor
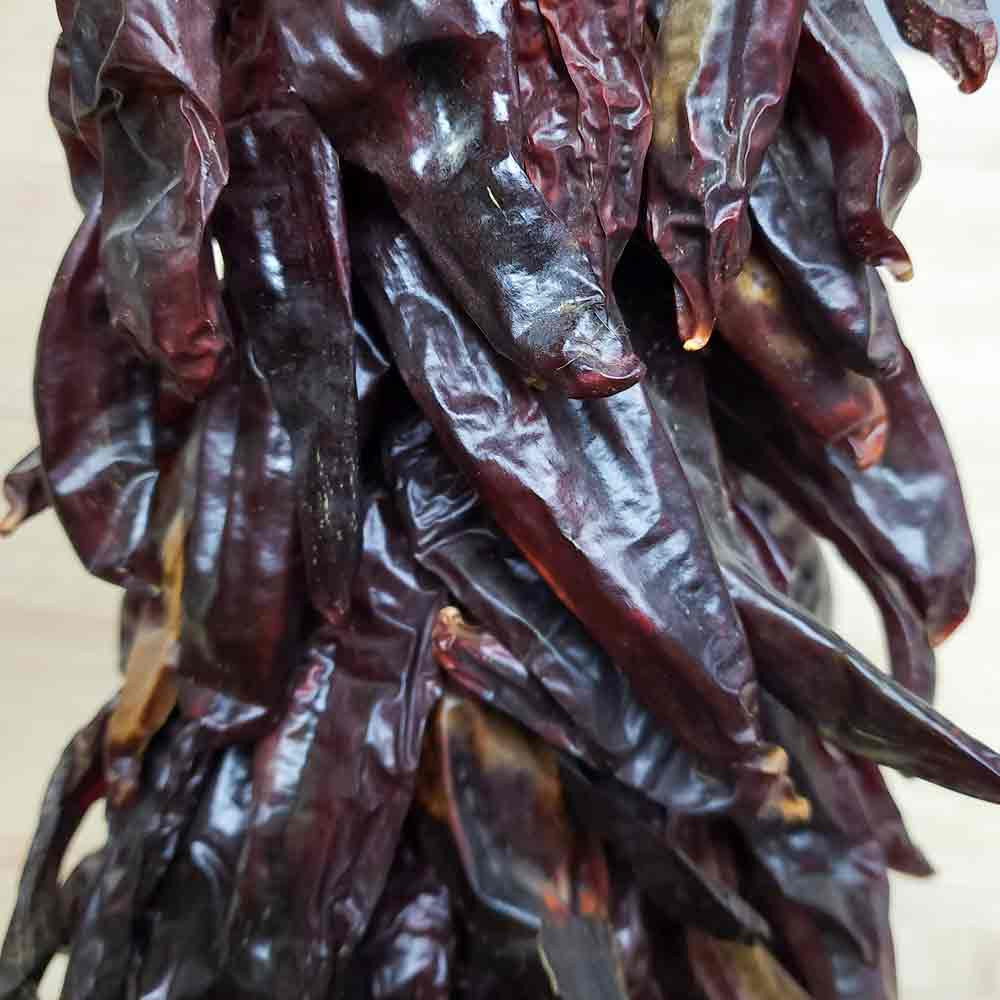
Traditionally, Sandia chiles are grown and used for the red dried fruit or pods, ground into chile powder and chile flakes, and are one of the most-used chiles for making ristras — the thick strings of dark red chiles you see hanging on patios, as interior decorations, and windows all over New Mexico.
This new open-pollinated Sandia has thicker flesh with thinner skin so that it can be used as a fresh green chile or as the traditional dried red pod. Part of the selection process was for a more extensive, leafier canopy to protect the ripening chiles and to keep the roots cooler, allowing more growth during the hotter months.
The plants are slightly shorter but put on more fruit than the standard Sandia, needing less space and water for production, making this variety an excellent choice for home gardeners.
Details
Nuevo Sandia plants have a single, strong main stem with regular branching that gives good foliage cover, reducing sunscald and supporting excellent fruit set. Mature plants usually reach 24 - 30” tall and up to 2’ wide. Even during hot weather, fruit will continue to set on the lower branches due to the shading of the leaves.
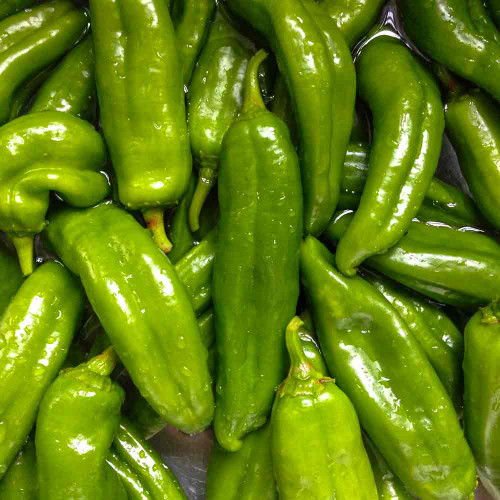
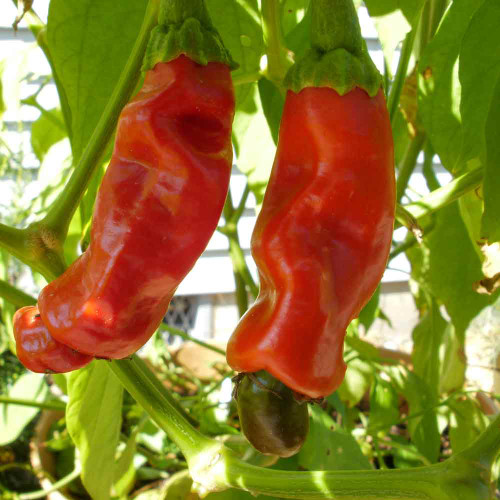
Young green chiles are bright green, transitioning to a deep, dark green as they mature. They can be used as a roasting chile at this stage or left on the plant to fully ripen, turning a deep, rich red that is almost black.
The pods or fruit generally have a straight, slightly roughened, wrinkly surface once dry. They do not have the deep folds found on most chiles used for roasting but are somewhat flattened with rounded shoulders. Pods taper gradually from the stem to the blossom end with rounded shoulders.
Chile’s characteristic heat is due to capsaicinoids, chemical compounds produced in glands on the fruit’s interior veins. They appear as tiny yellow droplets on the internal veins. The seeds are not a heat source; they can pick up capsaicinoids if they touch the veins. Several factors contribute to and affect capsaicinoid content, such as genetics, weather, growing conditions, and fruit age at harvest. Breeding and selection over 15 years have stabilized Nuevo Sandia’s heat; however, capsaicinoid content is affected by environmental conditions such as consistent soil moisture levels, afternoon shade, and high daily temperatures.
History
Chiles or peppers have been grown in New Mexico for at least four centuries since they were introduced to the indigenous tribes during Spanish exploration in the late 1500s.
In 1884, Dr. Fabián García, the first horticulturist at New Mexico College of Agriculture and Mechanic Arts — now New Mexico State University (NMSU) — began breeding the first improved New Mexican chile. He released the stable variety as ‘New Mexico No. 9’ in 1913, after 29 years of breeding and selection. This was the first New Mexican-type chile pod and the first cultivar from the new breeding program at NMSU.
Dr. García began his chile breeding career by improving the local chiles grown by Hispanic gardeners around Las Cruces, NM. He crossbred Mexican cultivars like the pasilla chile, chile negro varieties, Colorado chiles, and New Mexico landrace chiles like the widely popular ‘Chimayó.’
Dr. Roy Harper released the original ‘Sandia A’ variety from the NMSU breeding program in 1956; the name was simplified to just ‘Sandia’ in 1967 by the New Mexico Crop Improvement Association. It originated as a cross between ‘New Mexico No. 9’ and a California Anaheim-type cultivar, ripening earlier than ‘New Mexico No. 9’. Sandia chiles are shorter and have thinner flesh when compared to chiles used for roasted green chile.
In 2001, southern New Mexico chile growers began asking for a thicker-walled Sandia to use as a green chile and a dried red chile. Nuevo Sandia results from 15 years of breeding and repeated plant selection of the best examples, followed by multiple years of trials in isolation cages to ensure purity and productivity with flavor. One of the results is almost double production from the original Sandia with a stable heat level and a rich, deep flavor.
We were introduced to this unique Sandia chile during our first visit to a world-class chile seed grower in southern Arizona. It was later in the day, after touring his chile fields with dozens of different types of chiles destined for markets, restaurants, and canneries, with only a few outstanding plants selected to keep for seed out of thousands of candidates.
He casually mentioned an open-pollinated Sandia chile he had been working with, saying that he had doubled the harvest while selecting for a richer, deeper flavor with a pleasant heat without the harsh bite some New Mexican chiles are known for.
Our ears perked up, for this wasn’t just some ordinary chile grower trying to make a name for himself. In the 1980s, his chile breeding stabilized the heat and physical characteristics of a large, mild, intensely flavorful green chile, setting the standard for the commercial green and red chile industry. Even today, he supplies the Hatch chile growers with his seeds.
Uses
The Nuevo Sandia chile has multiple uses at home, both in the green and red stages. It is a food, a spice, a decoration, and a gift in the ristra form.
Green chiles excel in raw and cooked preparations such as roasting, grilling, and baking — with or without other ingredients. Its moderate spiciness lends itself well to a wide variety of savory dishes. Fire roasting the green chiles until the skins are charred and soft, then removing them and the seeds and veins inside is the most popular way to prepare them. After roasting, it is often chopped and added to salsas and sauces, served with egg dishes, stirred into soups and stews, tossed into pasta, or layered over tacos and nachos.
Nuevo Sandia pairs well with aged and fresh cheeses, pork, poultry, eggs, corn, tomatoes, black beans, rice, spices like cumin and coriander, cilantro, avocado, and zucchini.
Companion Planting
Planting basil among peppers repels fruit flies, thrips, and several beetle species that feed on the fruit. Basil’s aroma masks the volatile chemicals or scent from pepper (and tomato) plants. Alliums — onions, leeks, garlic, chives, scallions, and shallots — deter aphids and beetles. The scent of the alliums helps mask the scent of the pepper plants, making it harder for the pests to find them.
Planting Tip
Chile is a warm-season plant that needs a long, frost-free season to produce good-quality, high yields. Young plants are tender and suffer when temperatures are below 60°F and can die from a light frost.
Home gardeners have better results with starting seeds indoors, about 6-8 weeks before your last expected frost date. If you don’t know your last frost date, The National Gardening Association has a First and Last Frost Dates tool based on your ZIP code, which will show the historical dates in your area from the nearest weather station.
Nuevo Sandia chiles need about 120 days from starting seeds to harvest green chiles and about 165 days from starting seeds for a red chile crop. Use the frost date tool above to see your first frost date, then count backward either 120 or 165 days to know when you should start seeds indoors.
Pepper seeds can take 2-4 weeks to germinate and are sensitive to soil temperature. The optimal soil temperature is 80-85°F, and even 5°F below that can delay germination by 2 or 3 weeks. Use a heat mat, heating pad, and thermometer to maintain even soil temperature. Chile seeds don’t need light to germinate but thrive with a strong light source once the sprouts appear. If you see the seedlings stretching or becoming leggy, they need more light.
Soil moisture should be damp when sprouting, then slightly moist once the seedlings are up. Damp soil will leave a slight wet spot on the pad of your finger when touching the soil’s surface. You will feel the moisture but not see a wet spot with slightly moist soil. Avoid over-watering the seedlings to minimize damping off — a fungal disease and fungal gnats attracted to damp soil.
Harden off the seedlings one to two weeks before transplanting time by setting them outside in a sunny, protected area for a half hour for the first few days, then gradually increasing the outside time until they are outside full-time for transplanting.
Growing Tip
When transplanting, space Nuevo Sandia seedlings 18” apart to give them room to grow. Seedlings are tender, and their young root systems even more so — take extra care and time during transplanting to disturb their roots as little as possible. Give the seedling roots a boost by applying a 1/2 cup of fish emulsion or other organic fertilizer high in phosphorus.
Chile plants usually start flowering in mid-June in southern climates, with a single flower appearing first. Fruits from the early flowers are typically larger and deeper colored red when mature than later flowers and fruit.
Plants won’t set fruit when daily temperatures are below 55°F or above 95°F and shed flowers when nighttime temperatures are above 75°F. The plants can appear dormant but will usually resume flowering when temperatures drop back into their production range.
Chile pods reach full length in about 4 - 5 weeks, and pod weight increases as the fruit walls thicken as they mature. Mature green chile is usually ready 35 - 50 days after flowering.
For the best flavor and production with the least heat, chiles require consistent soil moisture levels in the top foot of the soil — this is where 90% of the plant’s roots are. You can test the soil moisture by inserting your index finger fully into the soil — you should easily feel that the soil is moist, but your finger shouldn’t be wet when you remove it.
The volume of water needed changes with how well the leaves cover the plant and the effects of wind, sunlight, temperature fluctuation, and humidity. Watch the youngest plant leaves — at the top — to estimate how often to water. When the leaves begin wilting is the prime time to water. With hot, dry conditions, fast-growing plants will wilt in the late afternoon. Drip irrigation with a timer is an excellent way to avoid over or under-watering your chile plants.
At the end of the season, gradually decreasing the irrigation frequency and amount helps the plants finish ripening and deepen the color of the last pods.
Harvest Tip
A mature green chile pod feels firm when squeezed, with medium-thick flesh. Wait until a few pods in the row start turning red — called the pinto stage — before doing your first harvest.
Waiting increases your overall yield. In a good season, you can expect to harvest green chiles two or three times if you don’t leave any to ripen into the red stage. The first green chile harvest is in early August in southern New Mexico, with the second harvest about four to five weeks later. Growers commonly harvest green chile once and leave the rest to fully ripen to red and dry on the plants before harvesting just before the first frost.
Harvest by clipping or cutting the chile stem from the plant; don’t pull or break the stem, as this makes the plant more susceptible to disease.
A fully mature red pod is large, free of disease and blemishes, with a deep dark red to reddish brown color. Typical red chile harvest time in southern New Mexico is early October, when the pods mature and have dried down to a leathery texture before the first frost hits. Hard frosts will rupture the cell walls of the pods, causing mold to develop inside the pod.
Harvest the red chile pods the same as green chile — cut the pod stem free of the plant, as close to the plant as possible if you are using the pods to string a ristra.
Learn More
- Growing Peppers 101
- Chile and Pepper Growing Tips
- Grow Better Peppers with Shade
- Fermented Pepper Sauce
- Fermented Chile Paste
From the soil to the seed to the food you eat - we'll help you grow your best garden!


